
Solar Power
Solar Powering Your Hut
There are lots of great sites on the internet that'll tell you all about the details and possibilities of using a Solar Panel System for powering a full house & even exporting your excess energy to the Grid (meaning that you can actually sell whatever extra power that you generate to the Electricity company. Some of them are a little long winded and overly technical for our purposes, so here's a summarized simple description of what you'll need to power your hut from a Solar Panel system.
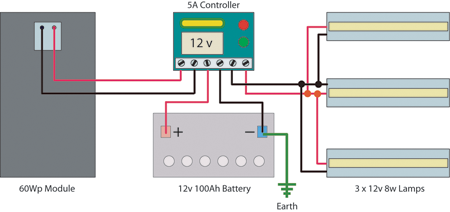
This wiring diagram is an example of the type of 12 Volt lighting systems that are common in homes throughout the developing world - and perfectly adequate for hutter's. It relies on the controller to provide fusing and battery protection, so you should choose a model of controller which incorporates these functions.
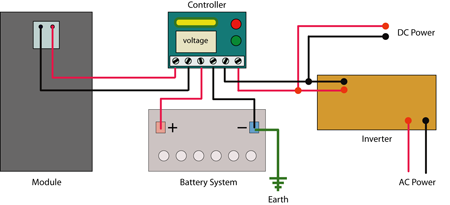
In addition to being able to run a 12V lighting and power system from your Solar Panel, you can also go one step further, and run ordinary 230V appliances (just as you would at home, by connecting an Inverter to your batteries. Whilst this is a possibility, it's really more suitable to large scale battery bank set ups and, ideally, an inverter should be connected to be connected to a battery that is being constantly charged by either a generator or even your car engine (using the Cigarette Lighter socket). The diagram below shows an Inverter in the system.
Solar Panels
Solar Panels make FREE electricity from the sun, have no moving parts to fail, and last over 25 years. They can be mounted on fixed, adjustable, or tracking type mounting systems. Getting power from the sun's energy is not only Free , but it's Fun to setup a solar energy system. Solar Panels come in different strengths... 5 Watts, 10 Watts, 20 Watts etc. For a typical hut at Carbeth, you'll need at least 20 Watts worth of Solar Panels. You could have one 40 Watt Panel (ideal), or 2 x 20 Watt / four 10 Watt panels. Up to 100 Watts of Panels is suitable for huts.
Solar Panel Wire Sizing
Again, there's lots of advice on the net on this subject. The idea is that by ensuring that you use exactly the correct size wiring, you'll get the best possible service fro your system. For a hut set-up, it's a good idea to use some nice heavy wiring FROM your Solar Panels TO your Batteries (Using normal domestic 3 core wire is ideal - use the Live and Neutral wires and just trim the Earth wire as you don't need it.
Use smaller, thinner wire running FROM your Batteries TO your lights and 12V appliances. A great tip is to use telephone extension wire - these can be bought from the Pound shop and you simply split the wire strands between Live and Neutral (Making sure that you ALWAYS use the same splitting arrangement). The reason for using thinner finer wire FROM your Batteries TO your lights, is that the Cable itself can hold a residual amount of power. In other words, even when you're not using your lights etc, some power can be lost from your batteries into the wires.
Solar Panel Controllers
Most websites will tell you to install a Controller. These are used to ensure that your Batteries don't over charge or over heat. For most of our systems at Carbeth, a Controller wont be necessary. As a guide, install a Controller for any system of 60 Watts or over. If you can afford it, you can buy a Controller that not only protects your Batteries from over charging, but it also has a built in Splitter - meaning that you can charge two Batteries (or "banks" of Batteries) from the same Solar Panel (or "array" of Panels).
The Battery System
There's lots to know about batteries, so check out the separate page.........Batteries
DC Loads (Lights & Appliances)
When using a 12V DC system (as we are here), the best idea is to keep the amount of Watts that you use to a minimum. So, whilst you can use all forts of 12V lighting designed for Caravans etc (as shown in the first diagram above), always try to keep the Wattage as low as possible. A great tip is to use LED lights. These can be bought really cheaply on Ebay and the draw very little power from your Batteries, so they'll burn brighter and longer than normal lights and they are extremely durable so ideal for huts.
When using Appliances, try to avoid using some of the fancier gadgets that are now available for Caravans etc. 12V Microwaves and Fridges might seem like a great idea, but they'll drain your Batteries very quickly. Again, it is possible to have these things at your hut but, if you're going to use one of these devices, you'd be better to hook it up through your car for the short time that you'll be using it (Microwave). For fridges, by far the best idea, is to have a 3 way caravan fridge, which can be run on bottled gas.
Modern moderately sized flat screen tv's have proven very popular recently - they can be powered by either a 230V household supply - or - a 12V DC supply, such as your Batteries. They use a very low Wattage and they usually come with built in Free view and DVD Player. These seem to be working well at Carbeth - it's a good idea to have a separate dedicated battery for it however as it will still need quite a bit of power, especially if you're using the DVD.
Inverters (for 230V appliances)
As indicated above, the small set ups that are suitable for hutting at Carbeth, are not really appropriate for using normal household (230V) gadgets and appliances. An Inverter lets you convert a 12V DC Supply (i.e. your Batteries), through the Inverter, into a 230V AC Supply, needed for normal domestic appliances. These are great for large scale 12V set ups - the kind that would be set up to power a normal house. These obviously have much more powerful Solar Panels and much more Battery capacity.
Earthing
The top diagram show a cable running from the Negative terminal on your Battery to an "Earth". The Earth is designed to allow any unexpected surge or fault in your power, to pass safely away into the ground. This is shown here because it's essential on large scale systems. This is not really necessary in a small set up such as the one you'll have in your hut. It will however do you no harm if you'd like to be Super Safe and earth your system. You'll need a piece of Copper, a rod is great or you can use a strip of copper - drive the rod as deep into the ground as you can (or bury the strip at about 2 feet deep, 600mm). Run a cable from the copper, to the Negative terminal on your Battery, or bank of Batteries.
The information above is equally applicable to Wind Turbines and many huts now have these set up and powering their Battery banks.
The general trend in Carbeth is to add to an already existing system. As a result you may wish to make a more complex and larger solar system in your hut. Below is a 'large' in hutters terms, 450 Ah system with details and notes as a guide.
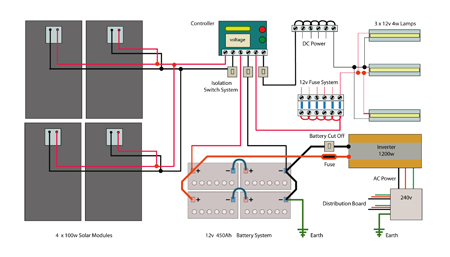
Image can be clicked to enlarge
How many panels?
This system is made up from 4 x 100w panels. A general rule of thumb is to have the same amounts of Watts as the Amp Hours of your batteries. The Carbeth environment has about every possible light variation and circumstance. Calculations can be complex and are at best estimates. This is an average assessment.
How many batteries?
The system illustrated has four 6 volt batteries wired in parallel and series to create a large 12 volt battery system.
Earthing
The system has separate earthing points. Some web sites advocate a shared earthing system others separate systems.
Controller
This system uses a 30a controller. The 12 volt system is fed to a fused 12 v distribution circuit each with a 3 amp fuse.
240 volt system via the inverter goes through a fused distribution board. The system is directly connected to the batteries separate from the 12 v system and is fused with an external 100amp fuse in the positive line. Most inverters are fused...some internally others externally. A lower amp external fuse is prudent.
A 12v battery cut of switch is a good safety feature. They come in many shapes and sizes.
Note also that all connections can be switched off. These switches are on the negative system side. Web debate is heated on what polarity is best. However the system as described has been rigorously tested and works.
Remember there is a sequence to shutting down your system. Solar panels first, power second and battery last, At start up - Battery first, power second and finally solar panels.
SOME GREAT LINKS FOR THIS SUBJECT
OTHERPOWER.COM - The CUTTING EDGE of Low Technology
SOLAR POWER, AN AMATEUR'S GUIDE - Lots of detail in an easy to read format
SOLARFACTS.COM - A Beginner's Guide to all things Solar Power
FAQs - A great FAQ site for everything relating to Solar Power systems.
DISCLAIMER: The information contained within this page is offered as a outline guide only. Expert advice should be sought when installing electrical systems.